Difference between revisions of "Camelot"
old_Daniel1 (talk | contribs) |
Anarchangel (talk | contribs) |
||
| (20 intermediate revisions by 8 users not shown) | |||
| Line 1: | Line 1: | ||
| − | + | The Clan City of Camelot is in the northern part of [[Avalon]]; it is home to the [[Knights of Avalon]] Clan, which is lead by Lord Galahad. This clan is dedicated to the old and long and mostly forgotten traditions of earth chivalry. | |
| − | + | '''Camelot Castle''' is the lair of the Dragon [[Tarasque]]. | |
| + | [[Image:CastleEast.png|thumb|right|350px|To the east of Camelot Castle lie the whompahs; to the southwest, the Westgate, grid exit, and mission booths]] | ||
| + | Getting there is a bit easier for clan players because the town is owned by their faction, but Omnis should have little problem reaching it. The fastest way is to use the [[Grid]] to Camelot (top level inside the grid), that requires 450+ Computer Literacy Skill. | ||
| − | + | Camelot has 2 [[Whom-Pah]]s, one from [[Wailing Wastes]] and another from [[Bliss]] (located in The Longest Road zone). | |
| + | Two narrow passages comprise the main gate into the main part of the city on the southwest wall at 1960 3705. | ||
| − | + | There is an outpost, walled like the city, dead west of the city and southeast of the [[Cyborg Citadel]], with a narrow ground-level entrance at 1550 3650 . | |
| + | ==Camelot Castle== | ||
| + | [[Image:CamelotWestgate.png|thumb|right|180px|Camelot Castle dominates the skyline, even from the Westgate]] | ||
| + | Enter this instance through the gate to the castle, there is a drawbridge that leads across the lava moat. | ||
| − | + | Inside, the instance itself is in two main sections. The first and upper floors are the actual castle itself where is safe for any players (even omnis) due to its 75% gas suppression. The many Knights guarding their castle will not fight anyone unless they are attacked. As soon as you enter the place, use the door on the left side and continue to a large room with pillars. This room will have a door on the south side that leads to a set of stairs to the basement of the castle. That is where the interesting part of this instance lies. | |
| − | |||
| − | |||
| − | |||
| − | |||
| − | |||
| − | |||
| − | |||
| − | |||
| − | |||
| − | |||
| − | |||
| − | Inside, the | ||
| − | |||
| − | |||
| − | |||
| − | |||
| − | |||
| + | '''This place is for level 150+ players, for a few reasons.''' One is the [[PvP]] part of it, and another is the last boss that you will encounter. I would recommend lowering your graphics setting a bit to avoid any latency (lag) due to the possible high number of players and actions being made in the basement. | ||
| + | [[Image:Camelot_castle_entrance.jpg|thumb|left|250px]] | ||
A few things and tips you need to know before you go downstairs. | A few things and tips you need to know before you go downstairs. | ||
| − | + | * Once you cross the door you are entering a 25% [[PvP#Gas|gas suppression area]], the entire basement has that setting and there is no safe place to sit down or rest. In other words you are in [[PvP]] territory. | |
| − | + | * You will only have a few seconds before you can be attacked, use every second to go as far inside as possible. | |
| − | + | * Stay with your team always, do not get separated and do not split in different directions. | |
| − | + | * Do not be surprised if you are ambushed by a rush from a team or group from the opposite faction trying to kill you. | |
| − | + | * Be well prepared with ammunition and medical supplies. | |
| − | + | * Everyone in your team should be buffed and ready to run and/or fight. | |
| − | |||
| − | |||
| − | |||
| − | |||
| + | It is in the first area of the basement (where there are actual rooms) where Omni and Clan players fight for domination of the basement. Those who remain in control are the ones likely going for the grand prize which is killing the genetically engineered giant dragon Tarasque which is at the bottom of the basement. Mobs will be level 100ish, for the exception of the bosses. | ||
| − | + | = Normal monsters= | |
| − | + | '''These are the mobs you will encounter before facing Tarasque: ''' | |
| − | |||
| − | |||
| − | |||
| − | |||
| − | |||
| − | |||
| + | *Ghasap's Minion | ||
| + | *Rider Lizard Scaly Lizard | ||
| + | *Jaded Lizard Arc Lizard | ||
| + | *Scarred Lizard | ||
Ghasap's Minions have a chance to drop these items: | Ghasap's Minions have a chance to drop these items: | ||
| + | *Engraved Torch | ||
| + | *Mosaic Layered Torch | ||
| + | *Outstanding Torch | ||
| + | *Quality Torch | ||
| + | *Corroded Blade | ||
| + | *Well-Worn Antiquated Sword | ||
| + | = The bosses = | ||
| + | == Morgan Le Faye == | ||
| + | {|border="2" align="center" cellpadding="5" cellspacing="0" style="border-top:1px solid #C0C0C0; border-right:1px solid #C0C0C0; border-bottom:2px solid #C0C0C0; border-left:1px solid #C0C0C0; border-collapse: collapse;" | ||
| + | |bgcolor="#C0C0C0" valign="top"| | ||
| + | [[Image:Unique_morgan_le_fay.jpg|250px]] | ||
| + | |valign="top"| | ||
| + | {| | ||
| + | |- | ||
| + | |colspan="2"| | ||
| + | As soon as you come down the stairs on the right side you will see that the first instance boss is located.<br> | ||
| + | '''Morgan Le Faye''' is a wicked looking woman who is level 115, and she is not too pleasant to interact with. She will attack on sight. You don't have to fight her unless you want to, she will be carrying some torturing devices which she loves to use on trespassers. Be aware she warps people to her and calms pets. She will respawn 9 hours after being killed. <br><br> | ||
| + | '''Mobart:''' Human boss<br> | ||
| + | '''Attitude:''' Aggressive<br> | ||
| + | '''Size:''' Normal<br> | ||
| + | '''Level:''' 115<br> | ||
| + | '''Respawntime:''' 9h<br> | ||
| + | |- | ||
| + | | '''Attack Information:''' | ||
| + | | '''Special Attack:''' | ||
| + | |- | ||
| + | |valign="top"| | ||
| + | Speed: | ||
| + | :0.8s/0.8s | ||
| + | Type: | ||
| + | :Melee (x2) | ||
| + | Range: 5m | ||
| + | |valign="top"| | ||
| + | *[[AUNO:158198|Stunned]] 12m | ||
| + | *[[AUNO:158199|Enslaved]] 10m | ||
| + | |- | ||
| + | |colspan="2"| | ||
| + | {| | ||
| + | |- | ||
| + | |colspawn="5"| | ||
| + | '''Immunities:''' | ||
| + | |-align="center" | ||
| + | |width=20%|<aodb link="false">46271</aodb><br>Calms:<br>''100%'' | ||
| + | |width=20%|<aodb link="false">46269</aodb><br>Charm:<br>''0%'' | ||
| + | |width=20%|<aodb link="false">46277</aodb><br>Snares:<br>''0%'' | ||
| + | |width=20%|<aodb link="false">46275</aodb><br>Roots:<br>''0%'' | ||
| + | |width=20%|<aodb link="false">38845</aodb><br>Blind:<br>''0%'' | ||
| + | |-align="center" | ||
| + | |<aodb link="false">117924</aodb><br>Divests &<br>Plunders:<br>''0%'' | ||
| + | |<aodb link="false">39125</aodb><br>NanoSkill<br>Debuffs:<br>''0%'' | ||
| + | |<aodb link="false">117957</aodb><br>Offensive<br>Debuffs:<br>''0%'' | ||
| + | |<aodb link="false">39098</aodb><br>Initiative<br>Debuffs:<br>''0%'' | ||
| + | |<aodb link="false">38864</aodb><br>Fear:<br><br>''100%'' | ||
| + | |} | ||
| + | |- | ||
| + | |colspan="2"| | ||
| + | '''Drop:'''<br> | ||
| + | *<aodb link="false">85160</aodb> [[AUNO:157900|A Well Shaped Tool of Torturing]] | ||
| + | *<aodb link="false">158269</aodb> [[AUNO:157903|Extra Curved Gutting Hook]] | ||
| + | |} | ||
| + | |} | ||
| − | + | == Lord Ghasap == | |
| − | + | {|border="2" align="center" cellpadding="5" cellspacing="0" style="border-top:1px solid #C0C0C0; border-right:1px solid #C0C0C0; border-bottom:2px solid #C0C0C0; border-left:1px solid #C0C0C0; border-collapse: collapse;" | |
| − | + | |bgcolor="#C0C0C0" valign="top"| | |
| − | + | [[Image:Camelot_castle_unique_ghasap.jpg|250px]] | |
| − | + | |valign="top"| | |
| − | + | {| | |
| − | + | |- | |
| − | + | |colspan="2"| | |
| − | |||
| − | |||
| − | |||
| − | |||
| − | |||
| − | |||
| − | |||
| − | |||
| − | |||
| − | |||
| − | |||
| − | |||
| − | |||
| − | |||
| − | |||
| − | |||
| − | |||
| − | |||
| − | |||
| − | |||
| − | |||
| − | |||
| − | |||
| − | |||
| − | |||
| − | |||
| − | |||
| − | |||
| − | |||
| − | |||
| − | |||
A bit further down you will have a chance to take a path to the left, which will lead you to a large room where Lord Ghasap (level 150) awaits someone (or anyone) to challenge to a fight, may as well be you right? | A bit further down you will have a chance to take a path to the left, which will lead you to a large room where Lord Ghasap (level 150) awaits someone (or anyone) to challenge to a fight, may as well be you right? | ||
| − | Of course there will be a catch. Once you kill him, he comes back to life as Reborn Lord Ghasap (level 200) who seems to be bigger, and not only that, he comes with 4 bodyguards named Lord Ghasap's Elite (level 150). This time he will be a much harder kill, it | + | Of course there will be a catch. Once you kill him, he comes back to life as Reborn Lord Ghasap (level 200) who seems to be bigger, and not only that, he comes with 4 bodyguards named Lord Ghasap's Elite (level 150). This time he will be a much harder kill, it is practically impossible to do without a team (unless you're level 215+). He will respawn 9 hours after being killed. |
The bodyguards don't drop any loot. | The bodyguards don't drop any loot. | ||
| + | '''Mobart:''' Skelett Boss<br> | ||
| + | '''Attitude:''' Aggressive<br> | ||
| + | '''Size:''' Normal<br> | ||
| + | '''Level:''' 120 / 200<br> | ||
| + | '''Respawntime:''' 20 minutes<br> | ||
| + | |- | ||
| + | | '''Attack Information:''' | ||
| + | | '''Special Attack:''' | ||
| + | |- | ||
| + | |valign="top"| | ||
| + | Speed: | ||
| + | :1.75s/1.75s | ||
| + | Type: | ||
| + | :Melee (x1) | ||
| + | Range: 2m | ||
| + | |valign="top"| | ||
| + | *[[AUNO:158317|Ghasap's Grasp]] 11m | ||
| + | |- | ||
| + | |colspan="2"| | ||
| + | {| | ||
| + | |- | ||
| + | |colspawn="5"| | ||
| + | '''Immunities:''' | ||
| + | |-align="center" | ||
| + | |width=20%|<aodb link="false">46271</aodb><br>Calms:<br>''100%'' | ||
| + | |width=20%|<aodb link="false">46269</aodb><br>Charm:<br>''0%'' | ||
| + | |width=20%|<aodb link="false">46277</aodb><br>Snares:<br>''0%'' | ||
| + | |width=20%|<aodb link="false">46275</aodb><br>Roots:<br>''0%'' | ||
| + | |width=20%|<aodb link="false">38845</aodb><br>Blind:<br>''0%'' | ||
| + | |-align="center" | ||
| + | |<aodb link="false">117924</aodb><br>Divests &<br>Plunders:<br>''0%'' | ||
| + | |<aodb link="false">39125</aodb><br>NanoSkill<br>Debuffs:<br>''0%'' | ||
| + | |<aodb link="false">117957</aodb><br>Offensive<br>Debuffs:<br>''0%'' | ||
| + | |<aodb link="false">39098</aodb><br>Initiative<br>Debuffs:<br>''0%'' | ||
| + | |<aodb link="false">38864</aodb><br>Fear:<br><br>''100%'' | ||
| + | |} | ||
| + | |- | ||
| + | |colspan="2"| | ||
| + | '''Drop:'''<br> | ||
| + | *<aodb link="false">85168</aodb> [[AUNO:158403|Fork of Ghasap (Lord Version)]] | ||
| + | *<aodb link="false">85168</aodb> [[AUNO:158321|Fork of Ghasap]] | ||
| + | *<aodb link="false">85168</aodb> [[AUNO:158299|Dreadful Pitchfork]] | ||
| + | *<aodb link="false">231182</aodb> [[AUNO:255553|Pattern of Imminent Death]] for the [[NT_AI_DoTs|NT AI dot]] | ||
| + | *<aodb link="false">231182</aodb> [[AUNO:255552|Pattern of Inevitable Death]] for the [[NT_AI_DoTs|NT AI dot]] | ||
| + | *<aodb link="false">151931</aodb> [[AUNO:200818|Corroded Ring]] | ||
| + | |} | ||
| + | |} | ||
| − | + | == Tarasque == | |
| − | |||
| − | |||
| − | |||
| − | |||
| − | |||
| − | |||
| − | |||
| − | |||
| − | |||
| − | |||
| − | |||
| − | |||
| − | |||
| − | |||
| − | |||
| − | |||
| − | |||
| − | |||
| − | |||
| − | |||
| − | |||
| − | |||
| − | |||
| − | |||
| − | |||
| − | |||
| − | |||
| − | |||
| − | |||
| − | |||
| − | |||
| − | |||
Now go back from the way you came and go deeper into the basement by going down a set of stairs. They will lead you to the first PvP encounter area. This specific room is called "the box" by many players, because of it's square shape and the boxes that lay in it. Both factions usually hold their ground here first to hold back the opposite faction. Defenders will be standing in two areas, right in front of the door into the room by boxes and around the corner by the door leading into the caves to cover more ground and eliminate any incoming rush of players. | Now go back from the way you came and go deeper into the basement by going down a set of stairs. They will lead you to the first PvP encounter area. This specific room is called "the box" by many players, because of it's square shape and the boxes that lay in it. Both factions usually hold their ground here first to hold back the opposite faction. Defenders will be standing in two areas, right in front of the door into the room by boxes and around the corner by the door leading into the caves to cover more ground and eliminate any incoming rush of players. | ||
| + | It is here where the excitement starts, with one side holding their ground and another rushing to break through. But this is not the end of the conflict in the basement, at least not most of the time. As you go past this room you will enter the caves where giant lizards roam. At the end of the first long cavernous corridor there will be a left and right openings, go left to travel towards Tarasque's lair. | ||
| − | + | The last room will be pretty large, with 14 Scarred Lizards spread out near the walls of the room. Most will not be in your way, so don't bother killing them. Now comes the second PvP encounter area. Usually players will stand near the door inside the room, waiting for the opposite faction to open the room and rush in. It is here where sometimes a last attempt to overtake the basement takes place (check the map). | |
| − | |||
| − | |||
| − | |||
| + | In the middle of the room is where Tarasque will spawn in all her gigantic glory. I was lucky enough to participate in one of the regular raids which is run by the Tnet raiding bot (I'm a member) from the Atlantean Server to take images of the dragon and players in action. | ||
| − | + | {|border="2" align="center" cellpadding="5" cellspacing="0" style="border-top:1px solid #C0C0C0; border-right:1px solid #C0C0C0; border-bottom:2px solid #C0C0C0; border-left:1px solid #C0C0C0; border-collapse: collapse;" | |
| − | + | |bgcolor="#FFFFFF" valign="top"| | |
| − | + | [[Image:Tarasque.jpg|200px]] | |
| − | + | |valign="top"| | |
| − | + | {| | |
| − | + | |- | |
| − | + | |colspan="2"| | |
| − | + | Tarasque even though it's level 200 will take more than 1 team to take on if you only have Classic AO, however if you have the Shadowlands expansion a single team of 210+ can deal with her. Be ready for a long fight, she has a lot of health (look at her size, and you will understand why). Don't try to pull her anywhere else because the spot where she appears is the best place to take her on, and she will never leave this room even if you tried. | |
| − | |||
| − | |||
| − | |||
| − | |||
| − | |||
| − | |||
| − | Tarasque even though it's level 200 will take more than 1 team to take on if you only have Classic AO, however if you have the Shadowlands expansion a single team of 210+ can deal with | ||
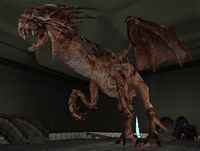
The dragon is often lovingly nicknamed "Tara" or "Chicken" by many players who have done a raid in that room. Now comes the good news, Tara drops a few of the most valuable items in the game, which leads me to the not-so-good news. It is because of the loot that a large number of high level players rarely pass an opportunity to raid and get a shot at the loot. As a side note, and to show how many are into raiding Tara, tnet has over 2,000 members and most joined for this reason alone. This of course has lead to PvP battles on a regular basis between factions. | The dragon is often lovingly nicknamed "Tara" or "Chicken" by many players who have done a raid in that room. Now comes the good news, Tara drops a few of the most valuable items in the game, which leads me to the not-so-good news. It is because of the loot that a large number of high level players rarely pass an opportunity to raid and get a shot at the loot. As a side note, and to show how many are into raiding Tara, tnet has over 2,000 members and most joined for this reason alone. This of course has lead to PvP battles on a regular basis between factions. | ||
| Line 166: | Line 189: | ||
Tarasque spawns every 9 hours after being killed. | Tarasque spawns every 9 hours after being killed. | ||
| − | Note: If you fall into the lava you will suffer 25 points of toxic substance damage. | + | Note: If you fall into the lava you will suffer 25 points of toxic substance damage. |
| − | + | '''Mobart:''' Dragon Boss<br> | |
| − | These are the items that Tarasque is likely to drop (not 100% on any of them, and only a handful will drop): | + | '''Attitude:''' Aggressive<br> |
| − | + | '''Size:''' Very, Very Big<br> | |
| − | + | '''Level:''' 200<br> | |
| − | + | '''Respawntime:''' 9 Hours<br> | |
| − | + | |- | |
| − | + | | '''Attack Information:''' | |
| − | + | | '''Special Attack:''' | |
| − | + | |- | |
| − | Signet Ring of the Green Knight | + | |valign="top"| |
| − | + | Speed: | |
| − | + | :1.75s/1.75s | |
| − | + | Type: | |
| − | + | :Melee (x2) | |
| − | + | Range: 5m | |
| − | Lump of Living Dragon Marrow | + | |valign="top"| |
| − | + | *[[AUNO:158011|Bite of the Tarasque]] | |
| − | Patch of Living Dragon Skin | + | *[[AUNO:168916|Consume in Flames]] |
| − | + | *[[AUNO:158711|Freezing Breath]] 40m | |
| − | Piece of Living Dragon Wing | + | *[[AUNO:158712|Corrosive Breath]] 40m |
| − | + | *[[AUNO:158716|Annihilating Breath]] | |
| − | Shard of Living Dragon Skull | + | *[[AUNO:234489|Spit of Tarrasque]] |
| − | + | *[[AUNO:158012|Stunned]] | |
| − | + | |- | |
| − | + | |colspan="2"| | |
| − | + | {| | |
| − | + | |- | |
| − | + | |colspawn="5"| | |
| − | + | '''Immunities:''' | |
| − | + | |-align="center" | |
| − | + | |width=20%|<aodb link="false">46271</aodb><br>Calms:<br>''100%'' | |
| − | + | |width=20%|<aodb link="false">46269</aodb><br>Charm:<br>''100%'' | |
| − | + | |width=20%|<aodb link="false">46277</aodb><br>Snares:<br>''100%'' | |
| − | + | |width=20%|<aodb link="false">46275</aodb><br>Roots:<br>''100%'' | |
| − | + | |width=20%|<aodb link="false">38845</aodb><br>Blind:<br>''0%'' | |
| − | + | |-align="center" | |
| − | + | |<aodb link="false">117924</aodb><br>Divests &<br>Plunders:<br>''100%'' | |
| − | + | |<aodb link="false">39125</aodb><br>NanoSkill<br>Debuffs:<br>''100%'' | |
| − | + | |<aodb link="false">117957</aodb><br>Offensive<br>Debuffs:<br>''0%'' | |
| − | + | |<aodb link="false">39098</aodb><br>Initiative<br>Debuffs:<br>''100%'' | |
| − | + | |<aodb link="false">38864</aodb><br>Fear:<br><br>''100%'' | |
| − | + | |} | |
| + | |- | ||
| + | |colspan="2"| | ||
| + | '''Drop:'''<br> | ||
| + | These are the items that Tarasque is likely to drop (not 100% on any of them, and only a handful will drop): <br> | ||
| + | {| | ||
| + | | | ||
| + | *<aodb link="false">158280</aodb> [[AUNO:157856|The Edge of the Tarasque]] | ||
| + | *<aodb link="false">131261</aodb> [[AUNO:158842|Typical Dragon Tooth Poker]] | ||
| + | *<aodb link="false">136738</aodb> [[AUNO:159136|Heavy-Headed Hardwood Staff]] | ||
| + | *<aodb link="false">82924</aodb> [[AUNO:158795|Gaily Painted Hood]] | ||
| + | *<aodb link="false">159134</aodb> [[AUNO:158844|Smelly Butcher Gloves]] | ||
| + | *<aodb link="false">12663</aodb> [[AUNO:158798|Aura Magnifier]] | ||
| + | *<aodb link="false">18849</aodb> [[AUNO:158800|Heavily Padded Overcoat]] | ||
| + | *<aodb link="false">99666</aodb> [[AUNO:158790|Robust Backpack]] | ||
| + | | | ||
| + | *<aodb link="false">22999</aodb> [[AUNO:158789|Smart Hood of the Wanderer]] | ||
| + | *<aodb link="false">22891</aodb> [[AUNO:158788|Cloak of the Wandering Knight]] | ||
| + | *<aodb link="false">151917</aodb> [[AUNO:158891|Hollow Bone Bracer of Merlin Ambrosius]] | ||
| + | *<aodb link="false">84046</aodb> [[AUNO:158801|Signet Ring of the Green Knight]] | ||
| + | *<aodb link="false">25798</aodb> [[AUNO:158797|Globe of Clarity]] | ||
| + | *<aodb link="false">25800</aodb> [[AUNO:158796|Globe of Sufferance]] | ||
| + | *<aodb link="false">12701</aodb> [[AUNO:158787|Heart of Tarasque]] | ||
| + | *<aodb link="false">12676</aodb> [[AUNO:158764|Sinew of Tarasque]] | ||
| + | |- | ||
| + | |colspan="2"| | ||
| + | These parts can be used to make the [[Living Dragon Armor]]: | ||
| + | *<aodb link="false">144701</aodb> [[AUNO:158895|Lump of Living Dragon Marrow]] Feet | ||
| + | *<aodb link="false">144709</aodb> [[AUNO:158892|Chunk of Living Dragon Flesh]] Body | ||
| + | *<aodb link="false">156555</aodb> [[AUNO:158893|Patch of Living Dragon Skin]] Leg | ||
| + | *<aodb link="false">144707</aodb> [[AUNO:158894|Piece of Living Dragon Wing]] Arm | ||
| + | *<aodb link="false">136596</aodb> [[AUNO:158896|Shard of Living Dragon Skull]] Head | ||
| + | |} | ||
| + | |} | ||
| + | |} | ||
| − | + | == Administrator De Valos == | |
| + | [[Patch 13.8]]: Administrator De Valos, who spawns after Tarrasque is killed.[https://www.ao-universe.com/index.php?id=14&pid=587] | ||
| − | |||
| − | + | = Map from this instance= | |
| + | [[Image:Camelot_castle_map.jpg]] | ||
| − | |||
| − | + | == See Also == | |
| + | * [[Armorsets]] | ||
| + | * [[Tarasque Upgrades]] (upgrades to drops from the Avalon Dragon) | ||
| − | + | [[category:Instance]] | |
| + | [[Category:Classic]] | ||
| + | [[Category:Playfields]] | ||
| + | [[de:Camelot_Castle]] | ||
Revision as of 22:35, 14 August 2018
The Clan City of Camelot is in the northern part of Avalon; it is home to the Knights of Avalon Clan, which is lead by Lord Galahad. This clan is dedicated to the old and long and mostly forgotten traditions of earth chivalry.
Camelot Castle is the lair of the Dragon Tarasque.
Getting there is a bit easier for clan players because the town is owned by their faction, but Omnis should have little problem reaching it. The fastest way is to use the Grid to Camelot (top level inside the grid), that requires 450+ Computer Literacy Skill.
Camelot has 2 Whom-Pahs, one from Wailing Wastes and another from Bliss (located in The Longest Road zone).
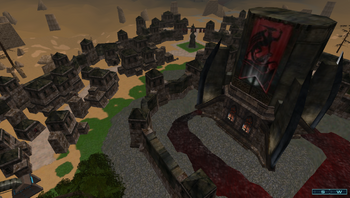
Two narrow passages comprise the main gate into the main part of the city on the southwest wall at 1960 3705.
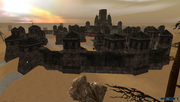
There is an outpost, walled like the city, dead west of the city and southeast of the Cyborg Citadel, with a narrow ground-level entrance at 1550 3650 .
Camelot Castle
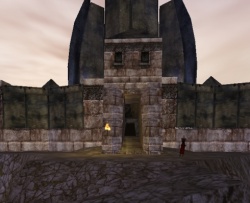
Enter this instance through the gate to the castle, there is a drawbridge that leads across the lava moat.
Inside, the instance itself is in two main sections. The first and upper floors are the actual castle itself where is safe for any players (even omnis) due to its 75% gas suppression. The many Knights guarding their castle will not fight anyone unless they are attacked. As soon as you enter the place, use the door on the left side and continue to a large room with pillars. This room will have a door on the south side that leads to a set of stairs to the basement of the castle. That is where the interesting part of this instance lies.
This place is for level 150+ players, for a few reasons. One is the PvP part of it, and another is the last boss that you will encounter. I would recommend lowering your graphics setting a bit to avoid any latency (lag) due to the possible high number of players and actions being made in the basement.
A few things and tips you need to know before you go downstairs.
- Once you cross the door you are entering a 25% gas suppression area, the entire basement has that setting and there is no safe place to sit down or rest. In other words you are in PvP territory.
- You will only have a few seconds before you can be attacked, use every second to go as far inside as possible.
- Stay with your team always, do not get separated and do not split in different directions.
- Do not be surprised if you are ambushed by a rush from a team or group from the opposite faction trying to kill you.
- Be well prepared with ammunition and medical supplies.
- Everyone in your team should be buffed and ready to run and/or fight.
It is in the first area of the basement (where there are actual rooms) where Omni and Clan players fight for domination of the basement. Those who remain in control are the ones likely going for the grand prize which is killing the genetically engineered giant dragon Tarasque which is at the bottom of the basement. Mobs will be level 100ish, for the exception of the bosses.
Normal monsters
These are the mobs you will encounter before facing Tarasque:
- Ghasap's Minion
- Rider Lizard Scaly Lizard
- Jaded Lizard Arc Lizard
- Scarred Lizard
Ghasap's Minions have a chance to drop these items:
- Engraved Torch
- Mosaic Layered Torch
- Outstanding Torch
- Quality Torch
- Corroded Blade
- Well-Worn Antiquated Sword
The bosses
Morgan Le Faye
| ||||||||||||||||||||||
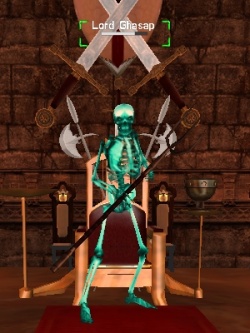
Lord Ghasap
| ||||||||||||||||||||||
Tarasque
Now go back from the way you came and go deeper into the basement by going down a set of stairs. They will lead you to the first PvP encounter area. This specific room is called "the box" by many players, because of it's square shape and the boxes that lay in it. Both factions usually hold their ground here first to hold back the opposite faction. Defenders will be standing in two areas, right in front of the door into the room by boxes and around the corner by the door leading into the caves to cover more ground and eliminate any incoming rush of players.
It is here where the excitement starts, with one side holding their ground and another rushing to break through. But this is not the end of the conflict in the basement, at least not most of the time. As you go past this room you will enter the caves where giant lizards roam. At the end of the first long cavernous corridor there will be a left and right openings, go left to travel towards Tarasque's lair.
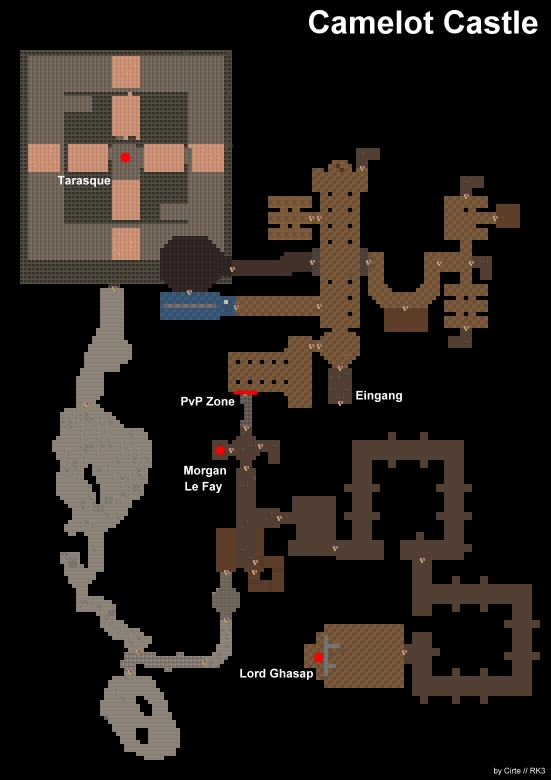
The last room will be pretty large, with 14 Scarred Lizards spread out near the walls of the room. Most will not be in your way, so don't bother killing them. Now comes the second PvP encounter area. Usually players will stand near the door inside the room, waiting for the opposite faction to open the room and rush in. It is here where sometimes a last attempt to overtake the basement takes place (check the map).
In the middle of the room is where Tarasque will spawn in all her gigantic glory. I was lucky enough to participate in one of the regular raids which is run by the Tnet raiding bot (I'm a member) from the Atlantean Server to take images of the dragon and players in action.
| ||||||||||||||||||||||||||
Administrator De Valos
Patch 13.8: Administrator De Valos, who spawns after Tarrasque is killed.[1]
Map from this instance
See Also
- Armorsets
- Tarasque Upgrades (upgrades to drops from the Avalon Dragon)
