Difference between revisions of "Pandemonium"
(→Zones) |
JungleGeorge (talk | contribs) m (→Monster) |
||
| (18 intermediate revisions by 8 users not shown) | |||
| Line 1: | Line 1: | ||
| + | {{Slpf}} | ||
[[Image:Pandemonium_overview.jpg|right|400px]] | [[Image:Pandemonium_overview.jpg|right|400px]] | ||
| + | Pandemonium is the final and most dangerous area to progress to in the [[Shadowlands]] and represents the heart of the Source and the technology used to open it. In this place, the Beast reigns and his influence has corrupted and compelled members from both the Redeemed and the Unredeemed to join him. Despite this, both sides have gardens open to the bravest warriors who would challenge the might of the Beast and claim the Source for their side. These gardens are unique in that they do not require keys or insignias to access and any member of any side can enter them and use their shops (assuming they are survive the onslaught of foes). | ||
| + | |||
| + | Pandemonium is almost exclusively used as a raid zone and it more or less entirely taken up by organized raid bots. The zone itself is considered to be 'inside' so programs that only work outside do not work in Pandemonium. | ||
= Zones = | = Zones = | ||
The zones in Pandemonium are named for the 4 zones of the 9th circle of hell in Dante Alighieri's Inferno. This circle of hell is reserved for various types of traitors. | The zones in Pandemonium are named for the 4 zones of the 9th circle of hell in Dante Alighieri's Inferno. This circle of hell is reserved for various types of traitors. | ||
| − | * ''' | + | * '''Caina''' |
:Reserved for traitors to their brothers, named for the Biblical character '''Cain'''. | :Reserved for traitors to their brothers, named for the Biblical character '''Cain'''. | ||
* '''Antenora''' | * '''Antenora''' | ||
: Named for '''Antenor of Troy''', who, according to legend, betrayed Troy to the Greeks. | : Named for '''Antenor of Troy''', who, according to legend, betrayed Troy to the Greeks. | ||
| − | * ''' | + | * '''Ptolemea''' |
:This zone is reserved for traitors to their guests, and is named for '''Ptolemy of Jericho''', who betrayed Simon Maccabaeus and his sons within that city's walls. | :This zone is reserved for traitors to their guests, and is named for '''Ptolemy of Jericho''', who betrayed Simon Maccabaeus and his sons within that city's walls. | ||
* '''Judecca''' | * '''Judecca''' | ||
| − | :The betrayer of Christ, '''Judas the Iscariot''' is the namesake for this zone, which is reserved for traitors to their gods. Sinners punished in this zone are completely frozen in ice. | + | :The betrayer of Christ, '''Judas the Iscariot''' is the namesake for this zone, which is reserved for traitors to their gods. Sinners punished in this zone are completely frozen in ice. In the center of this zone lives a three-headed '''Satan''', who happens to be eternally eating '''Brutus''', '''Cassius''' (both plotted to kill '''Julius Caesar'''), and the aforementioned '''Judas Iscariot'''. Dante is still down there farming points for his burden, I think. |
| − | |||
| − | |||
| − | |||
| − | |||
| − | |||
| − | |||
| − | |||
| − | |||
| − | |||
| − | |||
| − | |||
| − | |||
| − | |||
| − | |||
| − | |||
| − | |||
| − | |||
| − | |||
| − | |||
| − | |||
| − | |||
| − | |||
| − | |||
| − | |||
= Monster = | = Monster = | ||
| − | There are '''5 different sorts of mobs''' in | + | There are '''5 different sorts of mobs''' in Pande. |
These can drop this '''common loot''':<br> | These can drop this '''common loot''':<br> | ||
| − | < | + | <aodb opts="24px">227911</aodb> Glyph of the Arcana - Tradeskill: [[Chosen Armor]] [[Faithful Armor]] <br> |
| − | < | + | <aodb opts="24px">244993</aodb> Spiritech Medical Analyzer - [[Buff Armor]]<br> |
| − | < | + | <aodb opts="24px">244992</aodb> Spiritech Network Analyzer - [[Buff Armor]]<br> |
| − | < | + | <aodb opts="24px">244204</aodb> Meteorite Spikes<br> |
| − | < | + | <aodb opts="24px">244208</aodb> Poison Darts of the Deceptor<br> |
| − | < | + | <aodb opts="24px">244209</aodb> Capsule of Fulminating Novictum<br> |
| − | < | + | <aodb opts="24px">244211</aodb> Koan Shuriken <br> |
| − | < | + | <aodb opts="24px">244214</aodb> Fallen Star<br> |
| − | < | + | <aodb opts="24px">244215</aodb> Heroes Discus<br> |
| − | < | + | <aodb opts="24px">244216</aodb> Tear of Oedipus<br> |
{| | {| | ||
| Line 63: | Line 43: | ||
|valign="top" bgcolor="#C0C0C0" width="160"|[[Image:Mob_corrupted_xan-kuir.jpg|150px|center]] | |valign="top" bgcolor="#C0C0C0" width="160"|[[Image:Mob_corrupted_xan-kuir.jpg|150px|center]] | ||
|width="240" valign="top"| | |width="240" valign="top"| | ||
| − | '''Mob:''' [[ | + | '''Mob:''' Unredeemed '''[[Kuir]]''' ''(Spider)''<br> |
'''Level:''' ~250<br> | '''Level:''' ~250<br> | ||
| − | '''Behavior:''' Not aggressive but | + | '''Behavior:''' Not aggressive but social<br><br> |
'''Properties:''' Rootable, nuker.<br> | '''Properties:''' Rootable, nuker.<br> | ||
| − | '''Loot:''' | + | '''Loot:'''<br> |
| − | < | + | <aodb opts="24px">218350</aodb> Blue Glyph of Ocra<br> |
|} | |} | ||
|valign="top"| | |valign="top"| | ||
| Line 77: | Line 57: | ||
|valign="top" bgcolor="#C0C0C0" width="160"|[[Image:Mob_corrupted_xan-len.jpg|150px|center]] | |valign="top" bgcolor="#C0C0C0" width="160"|[[Image:Mob_corrupted_xan-len.jpg|150px|center]] | ||
|width="240" valign="top"| | |width="240" valign="top"| | ||
| − | '''Mob:''' [[ | + | '''Mob:''' Redeemed [[Len]] ''(Pink)''<br> |
'''Level:''' ~250<br> | '''Level:''' ~250<br> | ||
| − | '''Behavior:''' | + | '''Behavior:''' Aggressive<br><br> |
'''Properties:''' Can be calmed. Healer (complete heal)<br> | '''Properties:''' Can be calmed. Healer (complete heal)<br> | ||
'''Loot:'''<br> | '''Loot:'''<br> | ||
| − | < | + | <aodb opts="24px">218348</aodb> Blue Glyph of Aban<br> |
| − | < | + | <aodb opts="24px">218349</aodb> Blue Glyph of Enel<br> |
| − | < | + | <aodb opts="24px">218350</aodb> Blue Glyph of Ocra<br> |
|} | |} | ||
|- | |- | ||
| Line 99: | Line 79: | ||
'''Properties:''' ???<br> | '''Properties:''' ???<br> | ||
'''Loot:'''<br> | '''Loot:'''<br> | ||
| − | < | + | <aodb opts="24px">218348</aodb> Blue Glyph of Aban<br> |
| − | < | + | <aodb opts="24px">218349</aodb> Blue Glyph of Enel<br> |
| − | < | + | <aodb opts="24px">218350</aodb> Blue Glyph of Ocra<br> |
| − | < | + | <aodb opts="24px">215463</aodb> Supply Unit Armor |
|} | |} | ||
|valign="top"| | |valign="top"| | ||
| Line 111: | Line 91: | ||
|valign="top" bgcolor="#C0C0C0" width="160"|[[Image:Mob_corrupted_xan-cur.jpg|150px|center]] | |valign="top" bgcolor="#C0C0C0" width="160"|[[Image:Mob_corrupted_xan-cur.jpg|150px|center]] | ||
|width="240" valign="top"| | |width="240" valign="top"| | ||
| − | '''Mob:''' [[ | + | '''Mob:''' Unredeemed [[Cur]] ''(Blue)''<br> |
'''Level:''' ~250<br> | '''Level:''' ~250<br> | ||
'''Behavior:''' Aggressive<br><br> | '''Behavior:''' Aggressive<br><br> | ||
| − | '''Properties:'''Can be charmed. | + | '''Properties:'''Can be charmed. Full Auto kind of attack.<br> |
'''Loot:'''???<br> | '''Loot:'''???<br> | ||
| − | < | + | <aodb opts="24px">218349</aodb> Blue Glyph of Enel<br> |
| − | < | + | <aodb opts="24px">218350</aodb> Blue Glyph of Ocra<br> |
|} | |} | ||
|- | |- | ||
| Line 129: | Line 109: | ||
'''Mob:''' [[Chimera]] ''(Dog)''<br> | '''Mob:''' [[Chimera]] ''(Dog)''<br> | ||
'''Level:''' ~250<br> | '''Level:''' ~250<br> | ||
| − | '''Behavior:''' Not | + | '''Behavior:''' Not aggressive<br><br> |
'''Properties:''' ???<br> | '''Properties:''' ???<br> | ||
| − | '''Loot:''' | + | '''Loot:''' <br> |
| + | <aodb opts="24px">227515</aodb> Nano Crystal (Knowledge of The End)<br> | ||
|} | |} | ||
|valign="top"| | |valign="top"| | ||
| Line 139: | Line 120: | ||
In Pandemonium there are '''18 different bosses'''. These split into the following categories: | In Pandemonium there are '''18 different bosses'''. These split into the following categories: | ||
* 4 portal bosses, which need to be killed to advance to the next island and have no loot. | * 4 portal bosses, which need to be killed to advance to the next island and have no loot. | ||
| − | * 12 | + | * 12 Zodiac named bosses, which have wave 4 different spawn places: West, East, Middle, North. The first 4 are shared each by 3 different bosses of which only one spawns at random. |
| − | * 1 | + | * 1 Midway boss: The Night Heart (tnh) |
| − | * 1 | + | * 1 Final Boss: [[The Beast]] |
| − | == | + | == Portal Bosses == |
| − | The portal bosses need to be killed to advance the | + | The portal bosses need to be killed to advance the Pande raids.<br> |
| − | The guard portals between the different Islands. Once they are killed a blue portal opens for a few minutes. | + | The guard portals between the different Islands. Once they are killed a blue portal opens for a few minutes. Right clicking these will zone the player to the next area. |
| − | These portals are | + | These portals are one sided. To use them correctly you need to face south. |
Portal bosses respawn '''after 30 minutes'''. | Portal bosses respawn '''after 30 minutes'''. | ||
| Line 158: | Line 139: | ||
== The Zodiac bosses == | == The Zodiac bosses == | ||
| − | There are '''4 different | + | There are '''4 different spawn places''', which each can have one of 3 different bosses, resulting in 12 different bosses altogether.<br> |
| − | The | + | The spawn time for these bosses '''is 6 hours''' and the type of boss is randomly chosen from one of the 3 possibilities.<br> |
| − | 2 of these | + | 2 of these spawn places (E/W) lie outside the normal raid route to The Beast. The other 2 as well as the Midway boss are directly on it.<br> |
These mobs drop some very nice twinking items which mostly are nodrop and/or unique. | These mobs drop some very nice twinking items which mostly are nodrop and/or unique. | ||
{| | {| | ||
| Line 188: | Line 169: | ||
|} | |} | ||
| − | == | + | == Midway Boss - [[The Night Heart]] == |
| − | The ''second island'' has | + | The ''second island'' has the ''Midway boss''.<br> |
It has quite a few of adds and need to be treated carefully. If any players are going to the north of this boss, they pull in an additional number of adds "north", which quite often results in the end of the raid force. | It has quite a few of adds and need to be treated carefully. If any players are going to the north of this boss, they pull in an additional number of adds "north", which quite often results in the end of the raid force. | ||
The respawn time is '''6 hours''' and it is normally done together with Middle and North.<br> | The respawn time is '''6 hours''' and it is normally done together with Middle and North.<br> | ||
It drops twinking belts and high level symbs. | It drops twinking belts and high level symbs. | ||
| − | * [[The Night Heart]] | + | * [[The Night Heart]] (tnh) |
| − | == Final | + | == Final Boss - [[The Beast]]== |
| − | The final pandemonium boss is the biggest and most coveted boss in AO and has a little hole to itself. As we learned recently from | + | The final pandemonium boss is the biggest and most coveted boss in AO and has a little hole to itself. As we learned recently from [[Ergo]] in the inferno quests, it is the core of the Shadow Lands.<br> |
| − | + | Though the respawn time was formerly 18 hours, the 17.2 patch for LE changed the respawn time to '''9 Hours'''<br> | |
It drops a lot of very nice high level stuff. Most of it is nodrop and/or unique. | It drops a lot of very nice high level stuff. Most of it is nodrop and/or unique. | ||
| Line 209: | Line 190: | ||
<br>This side was copied and translated from the German version.<br> | <br>This side was copied and translated from the German version.<br> | ||
[[Benutzer:Cirte|Cirte]] 14:01, 3. Sep 2005 (CEST) | [[Benutzer:Cirte|Cirte]] 14:01, 3. Sep 2005 (CEST) | ||
| + | |||
| + | =External Links = | ||
| + | |||
| + | * [https://www.ao-universe.com/guides/shadowlands/quests-guides-2/pandemonium/pandemonium-2 Pande Raid] - AO Universe | ||
| + | * [https://www.ao-universe.com/guides/shadowlands/quests-guides-2/pandemonium/gauntlet Gauntlet] - AO Universe | ||
---- | ---- | ||
Latest revision as of 22:27, 3 March 2023
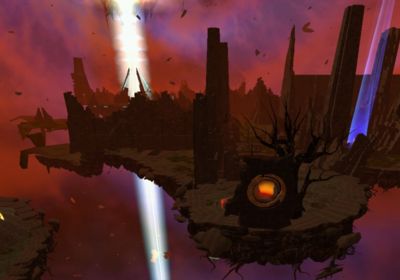
Pandemonium is the final and most dangerous area to progress to in the Shadowlands and represents the heart of the Source and the technology used to open it. In this place, the Beast reigns and his influence has corrupted and compelled members from both the Redeemed and the Unredeemed to join him. Despite this, both sides have gardens open to the bravest warriors who would challenge the might of the Beast and claim the Source for their side. These gardens are unique in that they do not require keys or insignias to access and any member of any side can enter them and use their shops (assuming they are survive the onslaught of foes).
Pandemonium is almost exclusively used as a raid zone and it more or less entirely taken up by organized raid bots. The zone itself is considered to be 'inside' so programs that only work outside do not work in Pandemonium.
Zones[edit]
The zones in Pandemonium are named for the 4 zones of the 9th circle of hell in Dante Alighieri's Inferno. This circle of hell is reserved for various types of traitors.
- Caina
- Reserved for traitors to their brothers, named for the Biblical character Cain.
- Antenora
- Named for Antenor of Troy, who, according to legend, betrayed Troy to the Greeks.
- Ptolemea
- This zone is reserved for traitors to their guests, and is named for Ptolemy of Jericho, who betrayed Simon Maccabaeus and his sons within that city's walls.
- Judecca
- The betrayer of Christ, Judas the Iscariot is the namesake for this zone, which is reserved for traitors to their gods. Sinners punished in this zone are completely frozen in ice. In the center of this zone lives a three-headed Satan, who happens to be eternally eating Brutus, Cassius (both plotted to kill Julius Caesar), and the aforementioned Judas Iscariot. Dante is still down there farming points for his burden, I think.
Monster[edit]
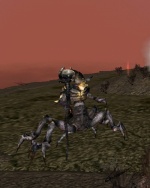
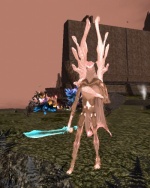
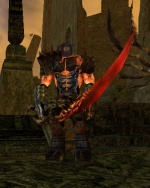
There are 5 different sorts of mobs in Pande.
These can drop this common loot:
![]() Glyph of the Arcana - Tradeskill: Chosen Armor Faithful Armor
Glyph of the Arcana - Tradeskill: Chosen Armor Faithful Armor
![]() Spiritech Medical Analyzer - Buff Armor
Spiritech Medical Analyzer - Buff Armor
![]() Spiritech Network Analyzer - Buff Armor
Spiritech Network Analyzer - Buff Armor
![]() Meteorite Spikes
Meteorite Spikes
![]() Poison Darts of the Deceptor
Poison Darts of the Deceptor
![]() Capsule of Fulminating Novictum
Capsule of Fulminating Novictum
![]() Koan Shuriken
Koan Shuriken
![]() Fallen Star
Fallen Star
![]() Heroes Discus
Heroes Discus
![]() Tear of Oedipus
Tear of Oedipus
|
| ||||||||
|
| ||||||||
|
|||||||||
Bosses[edit]
In Pandemonium there are 18 different bosses. These split into the following categories:
- 4 portal bosses, which need to be killed to advance to the next island and have no loot.
- 12 Zodiac named bosses, which have wave 4 different spawn places: West, East, Middle, North. The first 4 are shared each by 3 different bosses of which only one spawns at random.
- 1 Midway boss: The Night Heart (tnh)
- 1 Final Boss: The Beast
Portal Bosses[edit]
The portal bosses need to be killed to advance the Pande raids.
The guard portals between the different Islands. Once they are killed a blue portal opens for a few minutes. Right clicking these will zone the player to the next area.
These portals are one sided. To use them correctly you need to face south.
Portal bosses respawn after 30 minutes.
The names in order of these bosses are:
The Zodiac bosses[edit]
There are 4 different spawn places, which each can have one of 3 different bosses, resulting in 12 different bosses altogether.
The spawn time for these bosses is 6 hours and the type of boss is randomly chosen from one of the 3 possibilities.
2 of these spawn places (E/W) lie outside the normal raid route to The Beast. The other 2 as well as the Midway boss are directly on it.
These mobs drop some very nice twinking items which mostly are nodrop and/or unique.
|
Midway Boss - The Night Heart[edit]
The second island has the Midway boss.
It has quite a few of adds and need to be treated carefully. If any players are going to the north of this boss, they pull in an additional number of adds "north", which quite often results in the end of the raid force.
The respawn time is 6 hours and it is normally done together with Middle and North.
It drops twinking belts and high level symbs.
- The Night Heart (tnh)
Final Boss - The Beast[edit]
The final pandemonium boss is the biggest and most coveted boss in AO and has a little hole to itself. As we learned recently from Ergo in the inferno quests, it is the core of the Shadow Lands.
Though the respawn time was formerly 18 hours, the 17.2 patch for LE changed the respawn time to 9 Hours
It drops a lot of very nice high level stuff. Most of it is nodrop and/or unique.
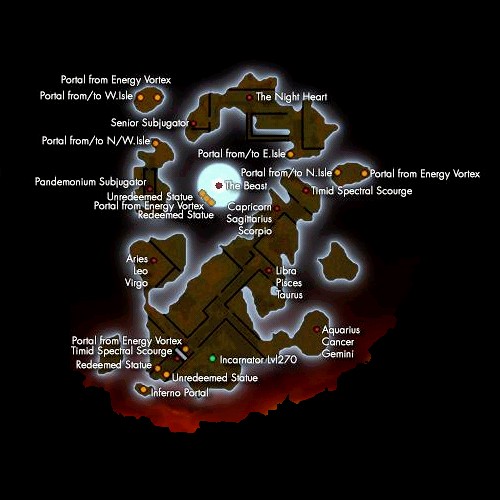
Pandemonium map[edit]
This side was copied and translated from the German version.
Cirte 14:01, 3. Sep 2005 (CEST)
External Links[edit]
- Pande Raid - AO Universe
- Gauntlet - AO Universe
