Difference between revisions of "Carbonrich Rock"
Anarchangel (talk | contribs) (Article Start) |
Anarchangel (talk | contribs) (Notes) |
||
| Line 4: | Line 4: | ||
Shift + left click, as with any item or player, will give extended information about it; in the case of Crystals, it will give the QL, whereupon the player can decide whether it is worth the risk or inventory space to take it. | Shift + left click, as with any item or player, will give extended information about it; in the case of Crystals, it will give the QL, whereupon the player can decide whether it is worth the risk or inventory space to take it. | ||
| + | |||
| + | Carbonrich rock models remain the same illumination whether at day or night, while the terrain, mobs, characters etc grow dark at night. They therefore glow relatively brightly at nightime, which is an impressive sight, especially in the [[Condemned Subway]] and at the [[Broken Shores]] fields, where there are numerous unmineable rock cluster models that enhance the apparent density of the fields. | ||
* [[4 Holes]]. Level: 1-60. Low crystals, scattered far amongst numerous tower field hazards, in a PvP zone. Most are QLs in the middle of the range | * [[4 Holes]]. Level: 1-60. Low crystals, scattered far amongst numerous tower field hazards, in a PvP zone. Most are QLs in the middle of the range | ||
Revision as of 04:31, 17 April 2013
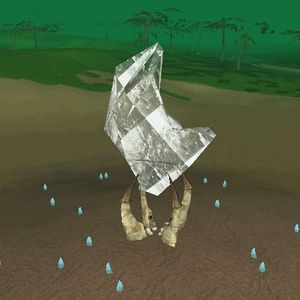
Carbonrich rocks are the only large-scale tradeskill ingredient that can be, or need be, as the player may wish to see it, harvested for free without combat. No tools are needed, and no points in any tradeskill; simply double-left-click on the crystal to add it to inventory. It is, in fact, a courtesy to a potential crafting provider to bring the ingredients to be crafted, and rocks are only the exception in that it takes relatively more effort to harvest a single one for a single nanocrystal than many for many. In general, the higher the QL, the better, although the crafter's Mechanical Engineering, Electrical Engineering, and Quantum Forcefield Technology skills are the limit to how high a level can be used. This is because those skills are needed to make Program Crystals out of the Rocks, while the Program Crystal can be of any QL equal to or greater than the intended Nano Crystal.
Shift + left click, as with any item or player, will give extended information about it; in the case of Crystals, it will give the QL, whereupon the player can decide whether it is worth the risk or inventory space to take it.
Carbonrich rock models remain the same illumination whether at day or night, while the terrain, mobs, characters etc grow dark at night. They therefore glow relatively brightly at nightime, which is an impressive sight, especially in the Condemned Subway and at the Broken Shores fields, where there are numerous unmineable rock cluster models that enhance the apparent density of the fields.
- 4 Holes. Level: 1-60. Low crystals, scattered far amongst numerous tower field hazards, in a PvP zone. Most are QLs in the middle of the range
- Condemned Subway. Level: 1-60. Low crystals, in a level-locked dungeon. Slum Runners to the right at the trench just before Vergil Aeneid. Most are QLs in the middle of the range
- Southern Artery Valley. Level: 10-60. 2620 x 2920. Clearing at Tsunayoshi Smith and The Big Soul Fragment. Low crystals, in a relatively high-level zone, but the gathering area itself is safe
- Broken Shores. Level: 1-150. 2350 x 3482 Open field, with scattered mob aggro
- Avalon. Level: 10-110. 2446 x 1317 The Notum Tree. One of the landmarks of Rubi-Ka. Small number of low-to-medium rocks with a fast respawn. No nearby creatures
- Avalon. Level: 10-110. 1672 x 763 Higher QLs guarded by Nanofreaks
- Central Artery Valley. Level: 30-245. 1200 x 1000 Four Rocks. More lower-QL rocks than Deep Artery Valley, but still mostly over QL 150
- Deep Artery Valley. Level: 60-230; most are QL150 or more. 1685 x 2950 Golem Island spiral maze. Note that while AO Universe calls 'Golem Island', "The Island of Fear and Loathing", that name belongs to area that the island is in, and includes goodly portions of the larger islands to the northwest and northeast. The island with the Golems on it may have been intended by the developers to be called The Island of Fear and Loathing, but players in general, and the Creative Student Productions map, call it Golem Island.
A Yalmaha is practically a requisite for Ore hunting. It gets you to the Ore faster and safer, and it can also be used to rid yourself of the enemies at the Ore deposits. Dive down towards an enemy, wait (a fraction of a second) for them to aggro you, and take off backwards and up. Once you are a certain distance up, melee enemies cannot hit you; a bit further, and ranged enemies cannot hit you either. Notice they have travelled away from their former position. Now turn around, and take off in the other direction. Once you have gone far enough away, you will have lost them entirely. Circle back, staying far enough away from the enemy; depending on the enemy type, their code may make them return to their former position if you, or any player, get too close. Missions with Clicksaver for Buff Weapons (also see Breakpoints#Weapons) will give you goods to sell for enough money to buy one of these incredibly useful but expensive tools. Since 2011, Yalmahas have become more scarce in the Luxury shops that exclusively sell them, by a factor of three or so.
