|
|
- Mob Type: Yuttos, Rubi-Ka unique boss
- Alignment: Monster
- Behaviour: Sight Aggro
- Level: 52-55
- Respawn Time: 10 Minutes
- Corpse Time: 30 Minutes
- Coordinates: ??
- Difficulty: Requires 6 non-twinked L40-45s, Soloable at L60 (Below Average difficulty)
- Tactics: Large low level teams should find this boss fight slightly challenging. The Curator (nicknamed Yoda), is essentially of a spell-caster class, and his fire nanos can wear down the team rather quickly. His normal attacks hit for 61-84, and crits are double. However, his trademarked skills (both resistable) are Abomination of the Immortal (deals up to 280 fire damage to the entire team and stuns for 3 seconds), and Wrath of the Immortal (deals up to 400 fire damage to a single target, and stuns for a further 3 seconds). This makes the fight problematic as without proper healing, the tank can go down after a few cycles of these nano programs. The healer will have a hard time topping off the team's health, and getting stunned after this devastating blast just makes matters worse. A decent pet makes the win easy, alternatively, another common strategy would be to have the DPSers hide behind the wall and attack from a distance. After every AoE nuke cycle, once the stun wears off, hide away and use your own treatment labs to restore your health. Do not depend on the healers as they will have much to do in this fight.
Attack Information
- Speed: (unknown)
- Type: melee
- Range: (unknown)
| | Immunities
| | Special Attacks
|
Drops:
|
Defender of the Three
casts area nukes
Respawn time: Need Info.
Difficulty: Requires 6 non-twinked L30s, Soloable at L60 (Very Easy Difficulty)
Tactics: Defender of Three (DoT) is the first boss encounter you will find in this new dungeon, and guards the entrance to the three prong split leading to higher level bosses. He can be challenging if your health is below 500 (e.g. NTs, MPs, nanomages in general). His attacks usually go for no more than 100, but his AoE fire nukes can pack quite a punch if your team composes of squishies. Every 15 seconds or so, he will raise both arms in the air and collapse them again in a circular pattern. This denotes that he is casting an AoE nuke which damages the team by 150. This is usually non-threatening to higher levels, but it can catch low healthed members unaware. If you are not tanking DoT, it is recommended to use a treatment lab in the middle of the fight to ease the healing effort of your healer.
| Attack Information
Need Info
| | Immunities
Need Info
| | Special Attacks
- Aoe Fire Nuke (150 dmg to anyone in the vicinity)
|
Drops:
Nematet the Custodian of Time
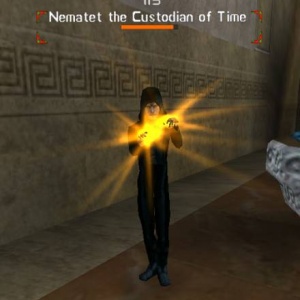 Nematet the Custodian of Time Respawn time: 20 min (?).
Difficulty: Requires 6 non-twinked L55s, Barely Soloable at L60 (Very Difficult)
Tactics: Often termed as the 2nd final boss of the dungeon, Nematet is yet another spell caster who utilizes fire as his main attack. He hits hard on the tank, ranging anywhere from 100-300, with critical hits going to as high as 600. These attacks are usually interspersed with fire nukes, which deals damage (~400) and roots the target to prevent him/her from running. He has an AoE fire aura which deals roughly 150 damage per tick (~150dmg/10s), and it is recommended to stay at least 20m away from him if you are not a melee DPSer. Stay your distance and burn him down as quick as possible: it will not be to your advantage if the fight drags long enough. Healers should concentrate heals on Nematet's main target as he/she will need much healing throughout the course of the fight.
| Attack Information
Need Info
| | Immunities
Need Info
| | Special Attacks
|
Drops:
Lien the Memorystalker
- Level 66.
Respawn time: 15 min
Difficulty: Requires 6 non-twinked L50s, Barely Soloable at L60 (Above Average Difficulty)
Tactics: Yet the final encounter of the left prong in the three way split, Lien has quite a few tricks up his hollow sleeve, making gratuitous use of AoE nanos. After carefully clearing the vicinity of all deathless legionnaires, engage Lien with a tank and allow him to pick up aggro from the 3 Ju-ju dolls Lien summons. Ranged casters/gunners should be stationed behind the wall facing Lien. The Ju-ju dolls deal light damage (~50) per hit, but have a whole lot health, somewhere close to a legionnaire itself. It will be very problematic if the healer has to deal with these dolls, as they will be nothing other than a distraction. Killing them is not imperative to your survival, and will mean nothing. The nano program to watch out for instead is Lien's Abomination of the Immortal. This insane nuke will deal at least 250 damage to your team and stun everyone for a further 5 seconds. Once chained, Lien must be dealt with quickly or your team will be sent to the reclaim in no time. Lien spams this spell once his health dips below 50%, and your DPS must pick up, or you will risk having your team wipe. It is a DPS race to a certain extent, but with a decent healer, this encounter will be made much easier, with ample rewards and loot awaiting you.
| Attack Information
Need Info
| | Immunities
Need Info
| | Special Attacks
Summons 3 Ju-ju Dolls on aggro.
|
Drops:
Guardian of Tomorrow
Respawn time: 20 min (?).
Difficulty: Requires 6 non-twinked L50s, Barely Soloable at L60 (Very Difficult)
Tactics: Don't be frightened by his size, because that's the only thing that will be a problem in this fight. If engaged by his own without any Eternal Guardians, the fight will be simple and straightforward: A normal tank and spank. The main trouble with the Guardian of Tomorrow (GoT) is that his flurry of attacks can overwhelm the tank or healer, which makes the fight challenging. His attacks do not tend to hit hard, ranging from only 50-100, with critical hits going up to a maximum of 250, but his side turrets and headbutts can stack damage rather quickly, doing about 3 attacks every 2 seconds. As long as the healer can heal through this damage, GoT will die and the path to Uklesh will be cleared. Do note however, kiting does not work well despite the huge room space for you to do so. It would require about 500 runspeed to kite him effectively.
Typically level 67. Too hard for the average under 61 level player to solo, but a good 3-4 person team can bring him down.
| Attack Information
If you don't have someone on your team that can root or snare him, GOT tends to move quickly around the hall, making it difficult for melee team members to maintain contact.
| | Immunities
Immune to poison damage.
| | Special Attacks
I believe he does either radiation or projectile damage.
|
Drops:
Gartua the Doorkeeper
Respawn time: 20 mins
Difficulty: Requires 6 non-twinked L40s, Soloable at L60 (Easy Difficulty)
Tactics: This fat atrox is lined with 4 similarly obese cultists in this small room. The boss fight comes as a package along with these 4 adds, and all 5 of them are usually taken together due to Gartua's low damage output. All of the atroxes in the room have the same skills: The typical challenger spell which adds bonus damage to their attacks, and a Mongo taunt which increases their health and applies a Heal over Time on them. AoEing is encouraged to quickly dispatch off the 4 cultists, while the rest of the team should concentrate fire on Gartua himself. This fight can get complicated in the array of brawls going around, but Gartua himself has rather low health and will go down easily.
Gartua has a very low drop rate for his goodies.
| Attack Information
Need Info
| | Immunities
Need Info
| | Special Attacks
Need Info
|
Drops:
Uklesh the Frozen
Respawn time: 25-30 mins ish.
Difficulty: Requires 6 non-twinked L60s, Almost Impossible to solo! (Extremely Difficult)
Tactics: Prepare for the toughest boss fight in the game yet! If you are facing this beast all by yourself for the first time, you will be in for a big shock. Uklesh's trademark skill is a passive stun ability along with his normal attacks. He has roughly a 50% chance to stun on each melee hit (depends on target's nano-resist). The stun lasts for 3 seconds only, but is unlikely to wear off before another stack of stun is applied. He hits fast and hard for about 100-300 damage, crits going up to a maximum of 700. The recommended team set up is at least 2 people capable of tanking, 1 decent healer, and the rest as DPS. Both tanks must juggle aggro effectively in order to prevent being stunned throughout the entire fight. Alternatively, 1 tank is adequate, but he must quickly snatch back aggro once a DPSer causes too much taunt to pull Uklesh. It can get chaotic, but with a proper team, Uklesh will go down after some time. Do not rest on your laurels though, heal quickly the moment you see Uklesh falling to his feet. Khalum will spawn immediately upon his death.
| Attack Information
Need Info
| | Immunities
Need Info
| | Special Attacks
Chance to stun for 3 seconds on hit.
|
Drops:
Khalum
Respawn time: Spawns after death of Uklesh the Frozen.
Difficulty: Requires 6 non-twinked L50s, Barely Soloable at L60 (Quite Difficult)
Tactics: AoE fest! Khalum will enter in his fiery splendor by shocking all team members to their feet with a 200 dmg fire aura upon spawning. He hits moderately hard (100-200), but his fire aura will tick away at your team's health. It should not deal much damage if you have already gotten this far, but nevertheless, it wears your team down for the next fight. Khalum is usually considered the weakest of the trilogy of bosses, and should not require much strategy to handle.
| Attack Information
Need Info
| | Immunities
Need Info
| | Special Attacks
Has an AOE fire-damage aura which hits surrounding players for ~200 damage every 10-15 seconds.
|
Drops:
Aztur the Immortal
- Final boss of the Temple of Three Winds
Respawn time: Spawns after death of Khalum. Period varies randomly from zero delay to several minutes.
Difficulty: Requires 6 well-equipped L60s, Almost impossible to solo! (SUPER EXTREMELY VERY DIFFICULT difficulty)
Tactics: Once Khalum tumbles to the ground, top off your own health and nano immediately. Aztur the Immortal will spawn, and he has well earned his title of being an Immortal. The tank should have at least 3000 health to tank this final boss of the entire Temple of the Three Winds Dungeon, and it is usually recommended to have 2 powerful healers supporting his back. 2 doctors are essential to keeping the tank alive as Aztur combines his Martial Arts prowess along with his equipped Stygian Desolator to cut through your tank. He essentially has 2 attack bars, both hurting equally as bad. Every hit goes for anywhere between 150-500, with critical hits amounting to a whopping 1000 points of damage! His attacks come fast, and all it takes is 3 lucky crits for him to wipe your tank and hence, your team. Heals must be spammed regularly to prevent this from happening. DPSers on the other hand will have a hard time landing hits or nanos on Aztur's skin. His defense rating is not something to be messed with, and you will be surprised that despite his bulky appearance, Aztur evades most of the attacks you send at him. Nanos will be resisted frequently and MA skills and abilities will be ducked almost every time (Do not rely on Flower of Life!). He has no skills aside from his normal attacks, turning the battle into an intense tank and spank. Another worthy point to note is his run speed. Aztur can easily catch up to anyone with a runspeed below 500, and kiting him is not recommended unless you are soloing him with a melee character. Yet another method of soloing him besides a Panther wielding Enfo is that of a Warbot/Slayerdroid Engineer, who can chomp down Aztur as if he weren't even there. For a typical team of a tank and healer though, do not expect this fight to be easy. You will likely take several tries to down this boss.
| Attack Information
Speed:
- 2.35s/2.35s
- 1.75s/1.75s
Type: Melee damage (x7)
Range: 5m
| | Immunities
Calms: 100%
Charms: 100%
Snares: 55%
Roots: 35%
| | Special Attacks
|
Drops:
He drops the Desolator every time he dies, sometimes multiples.
Loot
Almost all items here are NODROP, most of them are also UNIQUEs.
Weapons
Armor
Agent only. Windcaller Yen always drops two parts. Click here to see its cumulative stats
Rings of Three
It is possible to get all of the rings with the same name but different bonusses, UNIQUE does not apply to item's name but item's id.
Specialty Rings
Shoulder Pads
NCU & Belt
Implants
Nanos
Misc
Quest Item
Books
- See Martial Artist:Tips and Tricks
There is a quest in connection with these books The guy to talk to is named Hermit, and can be found at /waypoint 827, 2298, 647 (static, Tir Desert, Greater Tir County). He is well versed in the ancient languages, and says he can help you with the books you find in the temple. He is looking for Ape Fist of Khalum, Tree of Enlightenment, and Karmic Fist Book. When you bring him the completed books you will receive special Martial Arts attacks. The Karmic Fist is located in the Inner Sanctum.
Bracers
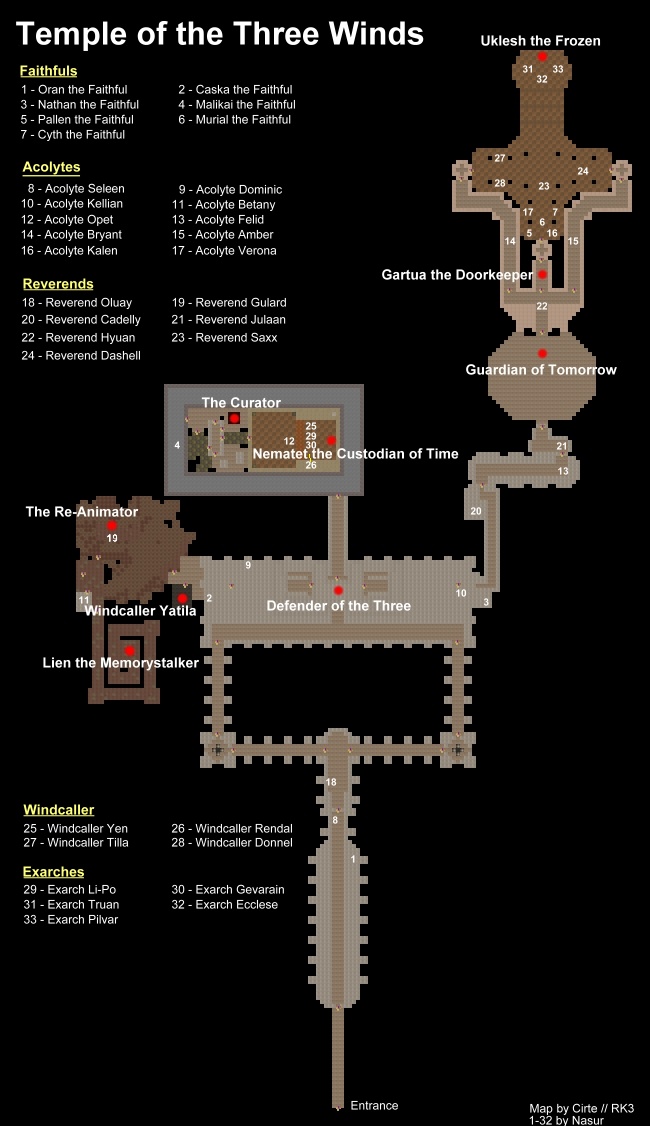
Map
Credits
Base of this article was taken from AoStratics.
Direct link to the original page: http://ao.stratics.com/content/guides/dungeons/templeofthreewinds.php?s=
Related Quests
|


